
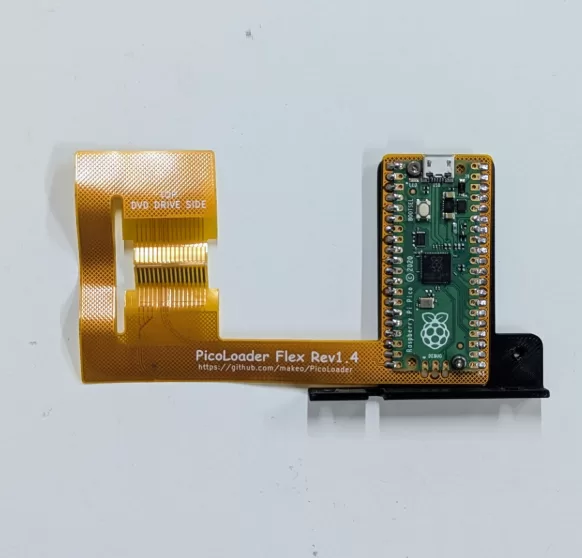
check video below (This picoloader you got already flashed, no need flash it anymore . meaning at 7:43 , skip it)
[youtube url="https://www.youtube.com/watch?v=cYWa9UjWpQw" width="500" height="300"]
Desciption:
How to Install PicoLoader: A Step-by-Step Guide to Modding Your GameCube
If you’re looking for the "best bang for your buck" mod for the Nintendo GameCube, PicoLoader is the current champion. Unlike the standard PicoBoot mod which requires soldering thin wires directly to the motherboard, PicoLoader uses a clever flex PCB that sits between your optical drive and the mainboard.
The best part? It’s fully reversible. If you ever want to return your console to stock, you just pull the mod out. Here is how to get it installed.
What You’ll Need
-
Raspberry Pi Pico (or Pico W)
-
PicoLoader Flex PCB Kit (includes the flex cable and 3D printed mounts)
-
Game Bit Screwdriver (to open the console)
-
Phillips #1 and #2 Screwdrivers
-
Soldering Iron and Solder
-
Tweezers
Step 1: Disassemble the GameCube
Start by flipping your GameCube over and removing the four large Game Bit screws from the corners. Flip it back over and carefully lift the top shell off.
-
Remove the outer screws: Use your Phillips #2 screwdriver to remove the screws around the sides and back of the internal frame.
-
Remove the fan assembly: Disconnect the fan and power assembly. There are often hidden screws underneath the back panel area, so be sure to clear those out.
-
Remove the front plates: Use a Phillips #1 screwdriver to remove the four small screws holding down the metal plates near the controller ports.
-
Disconnect the Optical Drive: Lift the entire optical drive assembly straight up to disconnect it from the motherboard. Set it aside for now.
Step 2: Prepare the Flex PCB
The flex PCB is delicate, so you need to fold it precisely to ensure a good connection.
-
Use the Jig: Most kits come with a 3D-printed folding jig. Place the flex PCB into the jig and fold it at the designated lines. This ensures the cable is the exact length needed to bridge the gap between the drive and the Pico mount.
-
Test Fit: Once folded, place the connector end of the flex PCB into the GameCube’s optical drive slot on the motherboard. It should sit snugly.
Step 3: Reinstall the Optical Drive
Now, place the optical drive assembly back onto the motherboard.
-
The Slit: Make sure the flex ribbon cable sits inside the little slit in the metal shielding. This prevents the cable from being pinched or severed when you tighten the screws.
-
Routing: Ensure the ribbon is routed behind the plastic posts next to the shielding so it has a clear path to the Pico mount.
Step 4: Mounting the Pico
-
Install the 3D Printed Mount: Secure the PicoLoader mount to the internal frame using the original GameCube screws.
-
Align the Pico: Place the Raspberry Pi Pico onto the mount. The flex PCB should sit between the Pico and the mount, with the gold pads of the ribbon lining up with the "castellated" holes on the edge of the Pico.
Step 5: Soldering
-
The Main Pins: Solder the ribbon cable pads to the Raspberry Pi Pico. Since the pads are aligned with the holes on the side of the Pico, you can simply apply heat and solder to create a bridge.
-
The Diode: To prevent power feedback, you must install a small diode. Look for the diode diagram on the flex PCB. Align the white stripe on the diode with the line on the diagram. Trim the legs to size, tin the pads on the PCB, and solder the diode into place using tweezers.
Step 6: Reassembly
With everything soldered, screw the internal shielding back into place.
-
Pro Tip: If the Pico mount blocks a screw hole for the shielding, check the side of the 3D-printed mount—many designs include a "storage" hole so you don't lose that extra screw!
Final Results
Once you have your Pico flashed with the PicoLoader firmware and Swiss, you'll be able to boot into homebrew instantly without needing a save exploit or a burned disc. You can now load games via an SD2SP2 or a memory card adapter and enjoy the ultimate GameCube experience!

Comments
No comments yet. Be the first to share your thoughts.